MEDITATING MONKS AT PONGOUR FALLS

Photograph by DANG NGO

HANGING OUT ON THE BROOKLYN BRIDGE, 1914

Photograph by Eugene de Salignac/Courtesy NYC Municipal Archives

MOUNT RAINIER CASTING A SHADOW ON CLOUDS

Photograph by Nick Lippert (via Komo News)

7 HOURS IN ONE IMAGE

Photograph by Isil Karanfil (isilkrnfl on deviantART)

ONE BOAT AND 145 WATER-SKIERS

Photograph by MARK SEATON PHOTOGRAPHY

Sunday, December 30, 2012

A women shares her home with 11 cats – four cheetahs, five lions and two tigers!

A women shares her home with 11 cats – four cheetahs, five lions and two tigers

Riana Van Nieuwenhuizen, shares her home with 11 cats – four cheetahs, five lions and two tigers! Wow, What a lady!
The sanctuary worker shares her South African home with not one but FOUR orphaned cheetahs, five lions and two tigers.
Forty-six-year-old Riana said: ‘I love them all. But they’re a handful.’
Riana bought her first cheetah, Fiela in 2006, after realising the big cats were in trouble and heading for extinction with only 1000 left in Africa.

Saturday, December 29, 2012

Save Digital Photos as RAW or JPEG

Save Digital Photos as RAW or JPEG
Should photographers save their digital photos in RAW format or JPEG in their camera? Many photographers are unsure which digital photo format has the best image quality.
However, most digital photos end up as JPEGs for printing or web display. The real choice is where to process the RAW image data from the digital sensor. Should photographers do it in the camera as part of the picture taking process, or save the RAW image data and process it later on a computer using specialist software, such as Adobe Lightroom or DxO Optics Pro.
Saving digital photos in RAW format is not a magical recipe to give instantly better photos than saving as a JPEG photo in the camera. Many photographers claim the JPEGs from their camera look just as good as the RAW images, and in some cases better.  They unintentionally are misleading themselves, and others, because they are not completely wrong. In ideal lighting conditions digital cameras produce JPEGs with little or no difference in quality to those from RAW files.

Friday, December 28, 2012

How to Protect Your Photos With A Watermark

How to Protect Your Photos With A Watermark
I’ve always disliked watermarks.  When I am asked to provide a portfolio review and see watermarks on the picture, I’m unable to even concentrate on the photo because I’m so distracted with the watermark.
However, about a year ago, I started watermarking my photos because I found a way to do it unobtrusively by using my signature on the photo.  After all, when you walk into an art gallery there are signatures on the photos, so why not recreate that same branding on your digital photos?

Mother's Love


Wednesday, November 28, 2012

Top 10 Overloaded Trucks

Top 10 Overloaded Trucks

Tuesday, November 27, 2012

Ten Tips for Taking Great Photographs in the Snow


November is one of the best times of year to take great photographs of polar bears, and Cape Churchill in Manitoba, Canada is known for being one of the best places to photograph these fearless, curious creatures. If you are interested in going to Cape Churchill, the only way there is by helicopter or tundra buggy, but I promise you it is an experience you will never forget.
To kick off my trip to Cape Churchill, my fellow photographer friends and I ate polar bear cookies as we loaded our gear on the helicopter.  Once we landed we had seconds to go from the helicopter to the tundra buggy. We would not touch the ground again for five days for our own safety.  As soon as we arrived, the polar bears took notice. Five minutes later they were sniffing and licking our footprints and headed toward our vehicle.

Monday, November 26, 2012

How to Get that "Photo Studio Look" Without a Photo Studio

I often hear portrait photographers lamenting the fact that they don’t have a studio.  I can understand where they are coming from (which is why I’m in the process of buying a studio right now), but I think that most photographers really don’t need a studio at all.  In fact, you can get that “studio look” in your photography without even leaving your living room.
There are several INEXPENSIVE ways to get a studio look in your photography without actually working in a studio.  The first way is to use a bed sheet, the second a reflector, and the third… use flash!

Method #1: The Free Option
Photography doesn’t have to be as complicated as it sometimes seems to be.  15 minutes ago, I wanted to take a picture to illustrate how you could get that “studio photography” look in your photos without expensive gear or even a studio.  So, I found a large window in my home to use as a light source for the photo.  Then, I went and hung a black bed sheet on the wall with some thumbtacks to use as a background.  Then, I took the picture.  Simple as that!  I had great photos of my kids in just 15 minutes without spending a dime on additional gear.
The photo below tells the rest of the story.  It totally works!

METHOD #2: The “Other” Free Option
See the photo below?  If I would have shot this in a studio, it would have turned out exactly the same.  No different at all.

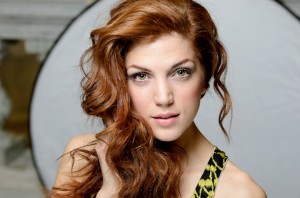
I shot this photo while in a building with horrible yellow incandescent lighting, while doing a video tutorial for the online portrait photography class.  We were doing a location shoot inside the Idaho State Capitol building, which is very dim and has ugly yellow lighting.  I wanted to show how you could get many different looks on a shoot in the same location, so I whipped out a reflector and turned it to the white side and placed it behind the model.
Then, I set up a 22″ beauty dish with a YN-560 flash (total cost $150) directly above the model and placed a reflector under the model (barely outside the frame) to kick back some more light onto her face.  This simple lighting set up (often called clam shell lighting since the flash and reflector envelop the model from above and below) turned out a great result.
Did I need an expensive set up for this photo?  Nope!  Just a little creativity in getting the studio look without a studio.

The Third Free Option
I think photographers who start out in flash photography limit themselves by not allowing themselves to think creatively.  Often while I’m on a shoot outdoors, I will create a few “night” portraits or “studio” portraits right on location no matter where we are or what time of day it is.
This technique is actually quite simple to do.  You just overpower the sun’s light with the light from your flash, then adjust the exposure on your camera.  If you turn up your flash power enough, you can make the background completely black (like a black studio background), or you can turn it most of the way up and make the background look like night even if it is the middle of the day.

5 Steps to Black Backgrounds Without Any Background At All!

A.Turn your camera to manual mode and grab a flash
B.Set the shutter speed at 1/200 (flash sync speed), and your ISO as low as it can go (usually ISO 100)
C.Adjust your aperture up until the picture is completely black.  This will usually be around f/18 or f/22
D.Use a flash on FULL POWER (you might need two flashes if it’s very bright outside).  Don’t worry about    
    the flash appearing too bright in the photo.  One you adjust your aperture to compensate for the bright            
    flash, it will look great
E.Snap the picture.  You can adjust the aperture until the brightness on the model looks right

If you have a low powered flash, this can be difficult to do if it’s exceptionally bright outside.  When it’s really bright, I often use two flashes and scoot the flashes in as close as possible to the model.  As long as you have enough flash power, you can get a black background without any background at all!  Is that cool or what?!?!

But wait!  There’s more!
There is more to getting the “studio look” in your photos than simply using a backdrop.  There are other aspects of working in a studio that can be achieved without actually owning a photography studio.
One of the main advantages of working in an actual studio is that the photographer can control the lighting 100% and doesn’t have to worry about annoying incandescent lights messing up the shot, or reflected light from shiny surfaces in the room.  Studio photographers can fix these problems by painting all walls and the ceiling white or black (the white is like having a built-in fill light and other photographers paint black to prevent any reflection).
So when working outside a studio, you can encounter problems because you get other light sources ruining the shot.  You can see an example of that in the photo below.  The light from the flashes is neutral, but the yellow incandescent highlights from the ugly yellow lights in the room are also hitting the subject and causing light inconsistencies.  You can address this in Photoshop by selectively changing the color temperature on the affected areas, but there is a much much simpler way.

The easiest way to prevent the overhead lights in a room from ruining your flash photography is simply to turn up the power of your flash.  If you overpower the light in the room, it won’t affect your photo at all!  When I shoot in a space like this with a lot of other ambient light sources, I usually turn the power on my flash up to full so that other room lights do not affect the photo nearly as much.
You could also gel your flash with a warming gel to better match the color temperature of the lighting in the room and then change your white balance, but who wants to go through that much trouble when you can just turn up the power?
Don’t want to miss any articles on The World Of Photography.???  Join our facebook group!
http://www.facebook.com/world.photography.cm


Thursday, November 8, 2012

20+ Beautiful Sun & Moon Photographs

Sunday, November 4, 2012

Very Rare Shots....Don't Miss Them


Tuesday, October 30, 2012

Jimmy Hickey Teaches How to Photograph a Stranger (Guest Post)


Note from Jim: I saw the video below last week as it was being passed around Pinterest (follow my photography boards here).  I have never written about street photography and photographing strangers before, so I contacted the creator of the video and asked him to share his best tips for photographing strangers here on Improve Photography.
                             
Photographing a stranger is something that is intimidating to a lot of photographers, and it’s completely understandable why. We are injecting ourselves into another persons life, and they might or might not be willing to let us photograph them. We might get turned down or forced to be in an awkward situation. But this struggle is something that is really fascinating because in a few short moments you can go from barely knowing someone, to creating an image with them that captures their true personality in photographic form. The photo captures automatically a little splinter of this persons existence, but a strong photo captures so much more.

Photographing strangers has always been a passion of mine from the first time I did it on the streets of Seattle until just yesterday while driving home in the Columbia River Gorge, and I am sure it will remain on my favorite thing to do list for a long, long time. I just turned 21, but I’ve been photographing strangers for years, it’s made me an animal. There’s some rules to this game, I wrote a manual. These four steps are what I use every time I want to photograph a stranger, and work well to both get the stranger to let you photograph them, and create a strong photograph in the process.
street photography
The Idea of Photographing Strangers 
You see a interesting person on the side of the road, before you stop the car, you must have an idea of the shot you want to create of this person. What will they be doing, how will they be posed, what will be in the background, what will the image represent etc. You need an idea before you commit to stopping this person and requiring time out of their day.

The Approach

Be confident, not just in your speaking skills, but in body language and overall presence. Be careful not to be too intimidating, and for sure not too afraid. You have to realize that they are going to be equally intimidated by your presence most of the time, if not more because you have a camera. So make the stranger feel comfortable, but feel you are a confident, successful, photographer, and they should be honored you want to create a frame with them. Start with a simple greeting, introduce yourself to them and mention why you want to photograph them. Some time people will be amazed that you noticed something unique about them, other times they will be somewhat smug and understand that they look “cool”. A simply opener I use is

“Hi, my name is Jimmy Hickey and I am a photographer based out of Portland Oregon. I’m working on a project photographing interesting people I meet no my travels. I noticed you biking on the side of the road and immediately thought I needed to photograph you. Would you mind if we talked for a little bit and I took a few photos of you? It should only take a few minutes then you’ll be on your way”

Obviously there is a lot of room to add in your own story and ideas, but that line has led to the majority of my shoots with strangers. The approach is intimidating at first, but does get better over time. You will only get better if you practice. Practice often, take photos of as many different strangers as you can and slowly you will get better and better at it. In regard to the time of the shoot, be sure to always mention that the shoot will only take a few minutes, you don’t know this persons schedule and they could be busy. But when you mention that it will only take a few minutes people are a lot more open to the scenario. If the location you are in isn’t ideal, suggest a quick move to a better shooting spot, but never more then a 10-30 yards, any more than that is a bit much. Plan your approach according to where you want to shoot them if possible. If the stranger says “no”, thank them for their time and send them on their way.


Man on motorcycle

The Creation
The best part! The actual creation of photographic images! This parts simple, TALK. Just ask them questions, get them talking about themselves. Ask questions relative to what they are wearing or where they are going or what they are doing. Ask them to expand on ideas and concepts. Just be a good listener, and be sure to ask relevant questions so they know you are paying attention. You need to make your subject feel comfortable. A photo of someone who is not at ease in front of the camera is going to be a bad photo. Keep the conversation positive and the shoot will go in a good direction. While all this is going on, study your subject, take some frames and just figure out the best way to capture them. Do not hide behind your camera, be sure to put the camera down (if they are not in a mega hurry) and talk for a few seconds before raising it back up. Once you have figured how to create the best image with them, don’t be afraid to ask them to pose a certain way or do a certain thing with their face at this time. Then simply take the best shot of your subject you possible can.

The Closing

After creating some gold, time to wrap her up! Show them an image, they will hopefully be excited about it. Thank them for their time, give them your business card or some way to contact you to see the photos. Ask if they would like a copy sent to them and if so SEND IT! Model releases are good ideas, and something I didn’t do originally with my strangers. Immediately write down any important details so you do not forget them over time. Do a write up if it was an interesting experience asap.

That simple!  It’s an intimidating process, but can be used to create some really strong photographs that would not have been created otherwise. 


One of my favorite stranger encounters:

This image represents everything I love about photography.

Street photography of a stranger

I traveled to Northern California, checked in to our motel room and no more than five minutes after getting settled in I saw this man getting out of his truck. Shirt off, cowboy hat, sweet beard, big belt buckle…having been busy this past month with paid work, I really haven’t had the time to dedicate the personal work I love to create.

I grabbed my camera, took my shirt off to fit in, and headed in his direction. I saw his Marine sticker on his rig and thanked him for his service. From there our conversation branched in to all subjects of life. The Cowboy, who’s name he wished to remain anonymous (but he did consider himself a cowboy and his nick name includes Cowboy), owns a horse ranch in Northern California as well as around 70 peacocks. He served in Vietnam and is currently taking the stock market for all it’s worth. He has survived multiple heart attacks and open heart surgery. To top it off, he is a bounty hunter for some pretty serious clients and wanted people. 95% of all money made through that goes into his foundation (again that I can’t name it, however it basically makes the world a better place)

We spoke for an hour about all sorts of things. There was never a dull moment. It was a extremely insightful and beautiful conversation. Despite the 97 degree heat beating down on my back.

Towards the end of the conversation I mentioned my love for capturing interesting people in photographs, and said I would be honored if I could take his portrait. He agreed under the condition that I kept his name private. We walked 10 feet away from where we were standing and created this frame.

I only shot for about 2 minutes, I knew the image I wanted in the location we had. He finished our conversation about a story from his experience in Vietnam.

He was assigned to take care of a small village. While there he handed out supplies to the people there. When he gave a small girl a wrapped bar of soap, she took it, and began eating it. At this point in the story, the hardened cowboy started to cry. This image was only captured by my eyes and only stored in my brain.

Traveling speaking, learning, befriending and capturing complete strangers. Every one of these encounters is an experience I take something important from, more than just an image. The worlds an amazing place and I am humbled by some of the people that inhabit this place.

SOURCE  : improve photography

Monday, October 29, 2012

Give Yourself an Honest Portfolio Review

Stage One Photographer
Beginning photographers can easily be spotted because they don’t know enough about the technical side of photography to do much with the camera, so they really only concern themselves with the person being photographed.

How to spot a stage one photographer…
  • They consider a photograph “good” when they captured an interesting expression on someone’s face, or something random or rare that occurred (like a fire or a UFO).  You can spot this from a mile away, because when looking at their portfolio, the photographer looks over your shoulder and starts explaining things in the picture because he failed to tell the story with the photo.
  • The photos are rarely sharp enough to show fine detail on the photos and all of them are taken from standing height
  • None of the photos show any artistic flair.  The photos would look the same if taken by any person who was standing in the same spot.
  • Almost all of the photographer’s portraits are zoomed way out.
  • If the photographer does any post-processing, it is spot color (all black and white except one item in the photo that is color).

Stage Two Photographer
Stage two photographers have gotten lucky a few times, and their pictures have been applauded by friends and family; however, they find themselves caught up in so many little tips and rules of photography that they manage to miss out on the biggest pieces.  For example, they find a beautiful landscape and concern themselves so much with the camera settings that they fail to notice that they are shooting in TERRIBLE lighting, or that the composition is dull.  Soon, they must learn that lighting and composition are more important than anything else.

How to spot a stage two photographer…
  • Some photos in the portfolio are slightly blurry or have other technical issues.  The photog at this stage is still paying so much attention to the subject that he frequently skips over the essentials.
  • Few of the photos in the portfolio have interesting lighting.
  • The photographer is happy with the pictures because they have started to use shallow depth-of-field in their portraits.
  • The photographer might follow the rule of thirds… but ignores the fact that sometimes the most interesting composition does not follow any “rule”.
  • The photographer takes out the camera for a picture when he sees an interesting PERSON or LANDSCAPE, but not when the photographer sees interesting lighting, shapes, or compositions.
  • Some of the photos are still taken from too far away, but other photos in the portfolio are zoomed in to the extreme.
  • Their portraits are posed with the subject placed right next to a “really pretty bush.”
  • Their favorite post-processing technique is spot color (all black and white except one piece of the photo in color).

Stage Three Photographer
By this point, the photographer has started to clue into the fact that lighting is a big deal.  They stop taking landscapes in the middle of the day and at least find shade to shoot portraits to avoid ugly harsh shadows.   Most of their pictures look better than an average person could do, and they are beginning to be known by friends and family as a photographer.

How to spot a stage three photographer…
  • Their best photos are macro shots of flowers.  At some point they need to realize that photos of flowers are EASY.
  • Their photos almost always incorporate good lighting, but they occasionally leave one in there with bad lighting because they really liked the subject, or because they have some sort of “war story” from the shoot that makes them especially fond of the photo.
  • A few of the photos in the portfolio look quite good, but most of them are just “nice.”
  • When the photos are shown to friends or family members, they have said things like, “Wow!  You could sell that!”
  • Stage three photographers are always eyeing the 5D Mark III or D800, and secretly tell themselves that their photos will finally be professional if they just had the right equipment.
  • They have entered the world of Photoshop and post-processing and can do some really neat tricks, but a professional would look at the photos and clearly see the image quality being ruined by untrained hands.  When I look through portfolios, I’m amazed how many pictures are WAY over-sharpened, grainy, or where the colors are all messed up.  This makes it easy to spot a stage three photographer.

Stage Four Photographer
Stage Four Photographers are just on the cusp of consistently producing professional work, but they still have some baby habits deeply ingrained in their heads.  These photographers are known by most of their family and friends as a “really serious photographer” and have at least considered going pro.  They spend a tremendous amount of time or effort working to get their work noticed by others, but have a tough time drawing as many eyeballs to their work as they would like.

How to spot a stage four photographer…

  • Most of their photos look good only because they include some interesting style or technique, rather than being a photo that can stand on its own.   Often this means that 90% of the photos have creatively tilted horizons, over-processed HDR photos (which they always describe as a “really subtle HDR effect”), overly vibrant colors, are taken from extreme angles, or are weirdly wide panoramas.  There is nothing WRONG with these techniques, but it is obvious when a photographer is using them as a crutch, because only a few of the photos in the portfolio can stand on their own without one of these techniques.
  • Every photo in their portfolio is quite good and any amateur photographer would be envious.
  • None of the photos in their portfolio have technical problems.  Everything is sharply focused, properly exposed, and most (but not all) of their poor Photoshop habits have gone by the wayside so their image quality is now quite good.
  • They have been asked by people who are NOT family members, friends, or co-workers to shoot an event for them or to buy their photos.
  • The photographer rarely notices it, but a trained eye sees many distracting elements in the photos that take away from the overall picture.

Stage Five Photographers
While these photographers are not all full-time pros, they are capable of consistently producing truly professional-quality work.  People can’t take their eyes off the photos they see from these photographers, and people often ask if the image was “Photoshopped” because the post-processing adds interest without creating surrealism.  They recognize that gear is fun to talk about and buy, but find themselves scaling back to just the essentials on many of their shoots.

How to spot a stage five photographer…
  • Every shot in the portfolio has perfect image quality (no graininess or wacko effects added in post-processing) and is shot with perfect technical skill.
  • The photographer is capable of shooting any event and returning with very good pictures that have interesting lighting.
  • The compositions of these photographers are mature and make the photo feel put-together and solid without being too extreme.
  • Each element in the frame is carefully placed and no distracting elements have slipped their way into the frame.  Each item in the photo plays a specific role in the overall composition.
  • The photos are not just “correct” or good, or even really good–they are jaw-droppingly good.
  • The photographer’s portraits are not only nice looking, but they actually communicate something about the person being photographed.  They truly “tell a story.”

Stage Six Photographers
These photographers have grown bored of taking “professional quality” pictures.  It is no longer challenging to go somewhere and create work that is impressive to others.  They find their drive to continue learning photography in challenging themselves with specific techniques and styles.

How to spot a stage six photographer…
  • Their work is no longer “random” with one sports picture, then a wildlife shot, then a landscape, etc.  All of the photos in the portfolio go together and you can spot the photographer’s style coming through in the work.
  • The photographers can create art without the crutch of a beautiful subject, even if that is what they choose to take pictures of.
  • They create photography for their enjoyment and the praise of others has at least deadened some.
The Takeaway
I hope that, by posting this, no one feels discouraged in their photography.  Portfolio reviews are not about seeing if you “measure up.”  They are intended to help you along your way in becoming the type of photographer that you want to be.
I hope you take the information from this post–realizing that it is the culmination of reviewing hundreds of portfolios–and decide on at least one thing you can do to become better.
What did you learn from this?  Be honest with yourself and share in the comments below.  I’m anxious to see what struck a chord with you.

Daimler Riding Car, 1885. The World’s First Motorbike.


Gottlieb Daimler and his ingenious colleague Wilhelm Maybach moved to Cannstatt near Stuttgart in 1882. Differences between the fifty-year-old Nikolaus August Otto and Daimler, two years his junior, had led to the latter’s departure from the Gasmotorenfabrik Deutz on the outskirts of Cologne. Now a wealthy man Daimler, could afford to make himself independent.

For 75,000 Goldmarks he bought a villa in Taubenheimstrasse in Cannstatt and moved there with his wife Emma and five children in June 1882. The property was ideal for his purposes: not only was it directly next to the spa facilities Daimler regularly visited for treatment for his weak heart, but it also benefited from a large garden and spacious summer house. He had an extension added to the latter, and installed a gas and water supply – his test workshop was ready.

In early October, Maybach also arrived in Cannstatt. He moved into a nearby property and initially converted one room of his apartment into a design office. Here he kept the drawing board on which he turned Daimler’s ideas into technical drafts: Maybach was skilled at giving them a functional form – and Daimler knew the value of his technician. When the two men agreed a contract even before leaving Deutz, Maybach was guaranteed substantial remuneration.

The goal shared by the two men was to develop a small, lightweight high-speed engine that was above all suitable for powering a vehicle. They were not alone, however. All around the world others were working on the same idea.

In 1885, the so-called riding car was built in Gottlieb Daimler's workshop as a test unit to prove the suitability of Daimler's and Wilhelm Maybach's gas or petroleum engine for everyday use.

Without knowing of each other’s work, Daimler and Benz had by this time already come to a common starting point: they both opted for petrol as the fuel for their engines and they would be the first to realise their efforts. The decision to use this fuel, which had excellent combustion characteristics, was fundamental to their internal combustion engines for vehicles.