MEDITATING MONKS AT PONGOUR FALLS

Photograph by DANG NGO

HANGING OUT ON THE BROOKLYN BRIDGE, 1914

Photograph by Eugene de Salignac/Courtesy NYC Municipal Archives

MOUNT RAINIER CASTING A SHADOW ON CLOUDS

Photograph by Nick Lippert (via Komo News)

7 HOURS IN ONE IMAGE

Photograph by Isil Karanfil (isilkrnfl on deviantART)

ONE BOAT AND 145 WATER-SKIERS

Photograph by MARK SEATON PHOTOGRAPHY

Showing posts with label Tips. Show all posts

Tuesday, June 18, 2013

5 Art Websites that Will Inspire You


Image from Flickr user Nina Matthews Photography
Art has the power to make us think outside the box, ask questions, fascinate and inspire curiosity. Whether the medium is through paint, photography or design, art is something that surrounds us every day and is objective in taste. We have compiled a list of  five websites that will dazzle your eyes, challenge your mind and expose you to many different lenses of artistic endeavors. This list is just the tip of the iceberg, so please feel free to tell us about any art websites that you recommend.
1.
ARTINFO
WHAT An online publication with up to the minute news about art and culture,
featuring reviews and events.
IN DETAIL ARTINFO.com is a creation of Louise Blouin Media and has a variety of
sections ranging from performing arts and fashion to lifestyle and visual arts.
UNIQUE For all the art connoisseurs out there, the site offers an index of sold paintings searchable by artist name, giving insight into the value of an artist at a given time and their marketing trend.
Image: Screenshot from ARTINFO.com
2.

Friday, January 11, 2013

Quit Dissing My Megapixels--I love all 36 million of them!

Quit Dissing My Megapixels--I love all 36 million of them!

First of all, I must say that I have resisted the urge to write this post for over a year because I know I am going to get dozens of comments saying nothing more than “Megapixels are unnecessary–I want ISO.”  I often think that photographers simply repeat what they have heard other pro photographers teach online, and stick to it instead of investigating things on their own.
Before I get nerdy on you, allow me to provide some background if you’re newer to this debate.  On a camera sensor, there are millions of light receptors (called photosites) that collect information about how much light is present, color, and other information.  It used to be, in the early days of digital photography, that camera manufacturers could only fit 2 or 3 million pixels on these sensors.  Now, a sensor of the same size can contain 30 or more megapixels.  The problem with the proliferation of mexapixels on a sensor is that it reduces the space available for each photosite.  The smaller the photosites are, the more difficult it is for camera manufacturers to create cameras that can take pictures with high ISO levels and still maintain a low amount of digital noise.  So many photographers argue that they don’t want camera manufacturers to keep adding more megapixels on a sensor, and would prefer that the manufacturers instead focus on low light performance.

I COMPLETELY understand this sentiment.  I have missed many pictures in low light environments because my camera simply couldn’t take a clean picture without adding more light to the scene with a flash.  I understand that if all else is equal, the camera with fewer megapixels will produce images with less noise because each photosite has a larger area of light to gather from.  I get it.  Really–I do.  This mirrors a conversation I had with Scott Bourne a few weeks ago at the Google+ Photographer’s Conference, where he argued that the new Nikon D800 (which has 36.3 megapixels) should not be used by portrait photographers because it has too many megapixels.  I very respect Scott, but we disagree on this point.

Future-Proof Your Images with Higher Megapixel Cameras

Wednesday, January 9, 2013

How to Photograph the Milky Way

How to Photograph the Milky Way
Last week, I took a photo of the Milky Way above an old schoolhouse building in Idaho. I posted the photo on our Facebook page, and it received 1,548 likes, 177 comments, and was shared 84 times. I was pretty happy (okay, fine… I was ecstatic) that so many of you said such nice things about my picture.
MANY of you asked how the photo was taken, and wanted a tutorial on photographing the Milky Way.  Your wish is my command.
Milky Way in Idaho
Camera Settings for Night Photography of the Milky Way

Wednesday, January 2, 2013

50 essential photography tips

50 essential photography tips
Whether photography is a hobby or a profession, you'll get a whole lot more out of it if you understand how it works. With a firm grasp of aperture, shutter speed, sensitivity and focal length, the ratio of truly great to merely mediocre shots you download at the end of an expedition is all but guaranteed to climb.
Here we present CNET UK's 50 essential shooters' tips. Don't uncap your lens without them.
Aperture
1. Understand aperture
The most fundamental element any photographer should understand is aperture. The aperture is the physical opening within your lens that allows light through to the sensor (or film in an older camera). The wider the aperture opening, the more light can pass through, and vice versa.

Saturday, December 29, 2012

Save Digital Photos as RAW or JPEG

Save Digital Photos as RAW or JPEG
Should photographers save their digital photos in RAW format or JPEG in their camera? Many photographers are unsure which digital photo format has the best image quality.
However, most digital photos end up as JPEGs for printing or web display. The real choice is where to process the RAW image data from the digital sensor. Should photographers do it in the camera as part of the picture taking process, or save the RAW image data and process it later on a computer using specialist software, such as Adobe Lightroom or DxO Optics Pro.
Saving digital photos in RAW format is not a magical recipe to give instantly better photos than saving as a JPEG photo in the camera. Many photographers claim the JPEGs from their camera look just as good as the RAW images, and in some cases better.  They unintentionally are misleading themselves, and others, because they are not completely wrong. In ideal lighting conditions digital cameras produce JPEGs with little or no difference in quality to those from RAW files.

Friday, December 28, 2012

How to Protect Your Photos With A Watermark

How to Protect Your Photos With A Watermark
I’ve always disliked watermarks.  When I am asked to provide a portfolio review and see watermarks on the picture, I’m unable to even concentrate on the photo because I’m so distracted with the watermark.
However, about a year ago, I started watermarking my photos because I found a way to do it unobtrusively by using my signature on the photo.  After all, when you walk into an art gallery there are signatures on the photos, so why not recreate that same branding on your digital photos?

Tuesday, November 27, 2012

Ten Tips for Taking Great Photographs in the Snow


November is one of the best times of year to take great photographs of polar bears, and Cape Churchill in Manitoba, Canada is known for being one of the best places to photograph these fearless, curious creatures. If you are interested in going to Cape Churchill, the only way there is by helicopter or tundra buggy, but I promise you it is an experience you will never forget.
To kick off my trip to Cape Churchill, my fellow photographer friends and I ate polar bear cookies as we loaded our gear on the helicopter.  Once we landed we had seconds to go from the helicopter to the tundra buggy. We would not touch the ground again for five days for our own safety.  As soon as we arrived, the polar bears took notice. Five minutes later they were sniffing and licking our footprints and headed toward our vehicle.

Monday, November 26, 2012

How to Get that "Photo Studio Look" Without a Photo Studio

I often hear portrait photographers lamenting the fact that they don’t have a studio.  I can understand where they are coming from (which is why I’m in the process of buying a studio right now), but I think that most photographers really don’t need a studio at all.  In fact, you can get that “studio look” in your photography without even leaving your living room.
There are several INEXPENSIVE ways to get a studio look in your photography without actually working in a studio.  The first way is to use a bed sheet, the second a reflector, and the third… use flash!

Method #1: The Free Option
Photography doesn’t have to be as complicated as it sometimes seems to be.  15 minutes ago, I wanted to take a picture to illustrate how you could get that “studio photography” look in your photos without expensive gear or even a studio.  So, I found a large window in my home to use as a light source for the photo.  Then, I went and hung a black bed sheet on the wall with some thumbtacks to use as a background.  Then, I took the picture.  Simple as that!  I had great photos of my kids in just 15 minutes without spending a dime on additional gear.
The photo below tells the rest of the story.  It totally works!

METHOD #2: The “Other” Free Option
See the photo below?  If I would have shot this in a studio, it would have turned out exactly the same.  No different at all.
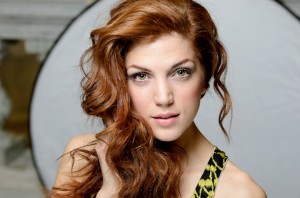
I shot this photo while in a building with horrible yellow incandescent lighting, while doing a video tutorial for the online portrait photography class.  We were doing a location shoot inside the Idaho State Capitol building, which is very dim and has ugly yellow lighting.  I wanted to show how you could get many different looks on a shoot in the same location, so I whipped out a reflector and turned it to the white side and placed it behind the model.
Then, I set up a 22″ beauty dish with a YN-560 flash (total cost $150) directly above the model and placed a reflector under the model (barely outside the frame) to kick back some more light onto her face.  This simple lighting set up (often called clam shell lighting since the flash and reflector envelop the model from above and below) turned out a great result.
Did I need an expensive set up for this photo?  Nope!  Just a little creativity in getting the studio look without a studio.

The Third Free Option
I think photographers who start out in flash photography limit themselves by not allowing themselves to think creatively.  Often while I’m on a shoot outdoors, I will create a few “night” portraits or “studio” portraits right on location no matter where we are or what time of day it is.
This technique is actually quite simple to do.  You just overpower the sun’s light with the light from your flash, then adjust the exposure on your camera.  If you turn up your flash power enough, you can make the background completely black (like a black studio background), or you can turn it most of the way up and make the background look like night even if it is the middle of the day.

5 Steps to Black Backgrounds Without Any Background At All!

A.Turn your camera to manual mode and grab a flash
B.Set the shutter speed at 1/200 (flash sync speed), and your ISO as low as it can go (usually ISO 100)
C.Adjust your aperture up until the picture is completely black.  This will usually be around f/18 or f/22
D.Use a flash on FULL POWER (you might need two flashes if it’s very bright outside).  Don’t worry about    
    the flash appearing too bright in the photo.  One you adjust your aperture to compensate for the bright            
    flash, it will look great
E.Snap the picture.  You can adjust the aperture until the brightness on the model looks right

If you have a low powered flash, this can be difficult to do if it’s exceptionally bright outside.  When it’s really bright, I often use two flashes and scoot the flashes in as close as possible to the model.  As long as you have enough flash power, you can get a black background without any background at all!  Is that cool or what?!?!

But wait!  There’s more!
There is more to getting the “studio look” in your photos than simply using a backdrop.  There are other aspects of working in a studio that can be achieved without actually owning a photography studio.
One of the main advantages of working in an actual studio is that the photographer can control the lighting 100% and doesn’t have to worry about annoying incandescent lights messing up the shot, or reflected light from shiny surfaces in the room.  Studio photographers can fix these problems by painting all walls and the ceiling white or black (the white is like having a built-in fill light and other photographers paint black to prevent any reflection).
So when working outside a studio, you can encounter problems because you get other light sources ruining the shot.  You can see an example of that in the photo below.  The light from the flashes is neutral, but the yellow incandescent highlights from the ugly yellow lights in the room are also hitting the subject and causing light inconsistencies.  You can address this in Photoshop by selectively changing the color temperature on the affected areas, but there is a much much simpler way.

The easiest way to prevent the overhead lights in a room from ruining your flash photography is simply to turn up the power of your flash.  If you overpower the light in the room, it won’t affect your photo at all!  When I shoot in a space like this with a lot of other ambient light sources, I usually turn the power on my flash up to full so that other room lights do not affect the photo nearly as much.
You could also gel your flash with a warming gel to better match the color temperature of the lighting in the room and then change your white balance, but who wants to go through that much trouble when you can just turn up the power?
Don’t want to miss any articles on The World Of Photography.???  Join our facebook group!
http://www.facebook.com/world.photography.cm


Tuesday, October 30, 2012

Jimmy Hickey Teaches How to Photograph a Stranger (Guest Post)


Note from Jim: I saw the video below last week as it was being passed around Pinterest (follow my photography boards here).  I have never written about street photography and photographing strangers before, so I contacted the creator of the video and asked him to share his best tips for photographing strangers here on Improve Photography.
                             
Photographing a stranger is something that is intimidating to a lot of photographers, and it’s completely understandable why. We are injecting ourselves into another persons life, and they might or might not be willing to let us photograph them. We might get turned down or forced to be in an awkward situation. But this struggle is something that is really fascinating because in a few short moments you can go from barely knowing someone, to creating an image with them that captures their true personality in photographic form. The photo captures automatically a little splinter of this persons existence, but a strong photo captures so much more.

Photographing strangers has always been a passion of mine from the first time I did it on the streets of Seattle until just yesterday while driving home in the Columbia River Gorge, and I am sure it will remain on my favorite thing to do list for a long, long time. I just turned 21, but I’ve been photographing strangers for years, it’s made me an animal. There’s some rules to this game, I wrote a manual. These four steps are what I use every time I want to photograph a stranger, and work well to both get the stranger to let you photograph them, and create a strong photograph in the process.
street photography
The Idea of Photographing Strangers 
You see a interesting person on the side of the road, before you stop the car, you must have an idea of the shot you want to create of this person. What will they be doing, how will they be posed, what will be in the background, what will the image represent etc. You need an idea before you commit to stopping this person and requiring time out of their day.

The Approach

Be confident, not just in your speaking skills, but in body language and overall presence. Be careful not to be too intimidating, and for sure not too afraid. You have to realize that they are going to be equally intimidated by your presence most of the time, if not more because you have a camera. So make the stranger feel comfortable, but feel you are a confident, successful, photographer, and they should be honored you want to create a frame with them. Start with a simple greeting, introduce yourself to them and mention why you want to photograph them. Some time people will be amazed that you noticed something unique about them, other times they will be somewhat smug and understand that they look “cool”. A simply opener I use is

“Hi, my name is Jimmy Hickey and I am a photographer based out of Portland Oregon. I’m working on a project photographing interesting people I meet no my travels. I noticed you biking on the side of the road and immediately thought I needed to photograph you. Would you mind if we talked for a little bit and I took a few photos of you? It should only take a few minutes then you’ll be on your way”

Obviously there is a lot of room to add in your own story and ideas, but that line has led to the majority of my shoots with strangers. The approach is intimidating at first, but does get better over time. You will only get better if you practice. Practice often, take photos of as many different strangers as you can and slowly you will get better and better at it. In regard to the time of the shoot, be sure to always mention that the shoot will only take a few minutes, you don’t know this persons schedule and they could be busy. But when you mention that it will only take a few minutes people are a lot more open to the scenario. If the location you are in isn’t ideal, suggest a quick move to a better shooting spot, but never more then a 10-30 yards, any more than that is a bit much. Plan your approach according to where you want to shoot them if possible. If the stranger says “no”, thank them for their time and send them on their way.


Man on motorcycle

The Creation
The best part! The actual creation of photographic images! This parts simple, TALK. Just ask them questions, get them talking about themselves. Ask questions relative to what they are wearing or where they are going or what they are doing. Ask them to expand on ideas and concepts. Just be a good listener, and be sure to ask relevant questions so they know you are paying attention. You need to make your subject feel comfortable. A photo of someone who is not at ease in front of the camera is going to be a bad photo. Keep the conversation positive and the shoot will go in a good direction. While all this is going on, study your subject, take some frames and just figure out the best way to capture them. Do not hide behind your camera, be sure to put the camera down (if they are not in a mega hurry) and talk for a few seconds before raising it back up. Once you have figured how to create the best image with them, don’t be afraid to ask them to pose a certain way or do a certain thing with their face at this time. Then simply take the best shot of your subject you possible can.

The Closing

After creating some gold, time to wrap her up! Show them an image, they will hopefully be excited about it. Thank them for their time, give them your business card or some way to contact you to see the photos. Ask if they would like a copy sent to them and if so SEND IT! Model releases are good ideas, and something I didn’t do originally with my strangers. Immediately write down any important details so you do not forget them over time. Do a write up if it was an interesting experience asap.

That simple!  It’s an intimidating process, but can be used to create some really strong photographs that would not have been created otherwise. 


One of my favorite stranger encounters:

This image represents everything I love about photography.

Street photography of a stranger

I traveled to Northern California, checked in to our motel room and no more than five minutes after getting settled in I saw this man getting out of his truck. Shirt off, cowboy hat, sweet beard, big belt buckle…having been busy this past month with paid work, I really haven’t had the time to dedicate the personal work I love to create.

I grabbed my camera, took my shirt off to fit in, and headed in his direction. I saw his Marine sticker on his rig and thanked him for his service. From there our conversation branched in to all subjects of life. The Cowboy, who’s name he wished to remain anonymous (but he did consider himself a cowboy and his nick name includes Cowboy), owns a horse ranch in Northern California as well as around 70 peacocks. He served in Vietnam and is currently taking the stock market for all it’s worth. He has survived multiple heart attacks and open heart surgery. To top it off, he is a bounty hunter for some pretty serious clients and wanted people. 95% of all money made through that goes into his foundation (again that I can’t name it, however it basically makes the world a better place)

We spoke for an hour about all sorts of things. There was never a dull moment. It was a extremely insightful and beautiful conversation. Despite the 97 degree heat beating down on my back.

Towards the end of the conversation I mentioned my love for capturing interesting people in photographs, and said I would be honored if I could take his portrait. He agreed under the condition that I kept his name private. We walked 10 feet away from where we were standing and created this frame.

I only shot for about 2 minutes, I knew the image I wanted in the location we had. He finished our conversation about a story from his experience in Vietnam.

He was assigned to take care of a small village. While there he handed out supplies to the people there. When he gave a small girl a wrapped bar of soap, she took it, and began eating it. At this point in the story, the hardened cowboy started to cry. This image was only captured by my eyes and only stored in my brain.

Traveling speaking, learning, befriending and capturing complete strangers. Every one of these encounters is an experience I take something important from, more than just an image. The worlds an amazing place and I am humbled by some of the people that inhabit this place.

SOURCE  : improve photography

Monday, October 29, 2012

Give Yourself an Honest Portfolio Review

Stage One Photographer
Beginning photographers can easily be spotted because they don’t know enough about the technical side of photography to do much with the camera, so they really only concern themselves with the person being photographed.

How to spot a stage one photographer…
  • They consider a photograph “good” when they captured an interesting expression on someone’s face, or something random or rare that occurred (like a fire or a UFO).  You can spot this from a mile away, because when looking at their portfolio, the photographer looks over your shoulder and starts explaining things in the picture because he failed to tell the story with the photo.
  • The photos are rarely sharp enough to show fine detail on the photos and all of them are taken from standing height
  • None of the photos show any artistic flair.  The photos would look the same if taken by any person who was standing in the same spot.
  • Almost all of the photographer’s portraits are zoomed way out.
  • If the photographer does any post-processing, it is spot color (all black and white except one item in the photo that is color).

Stage Two Photographer
Stage two photographers have gotten lucky a few times, and their pictures have been applauded by friends and family; however, they find themselves caught up in so many little tips and rules of photography that they manage to miss out on the biggest pieces.  For example, they find a beautiful landscape and concern themselves so much with the camera settings that they fail to notice that they are shooting in TERRIBLE lighting, or that the composition is dull.  Soon, they must learn that lighting and composition are more important than anything else.

How to spot a stage two photographer…
  • Some photos in the portfolio are slightly blurry or have other technical issues.  The photog at this stage is still paying so much attention to the subject that he frequently skips over the essentials.
  • Few of the photos in the portfolio have interesting lighting.
  • The photographer is happy with the pictures because they have started to use shallow depth-of-field in their portraits.
  • The photographer might follow the rule of thirds… but ignores the fact that sometimes the most interesting composition does not follow any “rule”.
  • The photographer takes out the camera for a picture when he sees an interesting PERSON or LANDSCAPE, but not when the photographer sees interesting lighting, shapes, or compositions.
  • Some of the photos are still taken from too far away, but other photos in the portfolio are zoomed in to the extreme.
  • Their portraits are posed with the subject placed right next to a “really pretty bush.”
  • Their favorite post-processing technique is spot color (all black and white except one piece of the photo in color).

Stage Three Photographer
By this point, the photographer has started to clue into the fact that lighting is a big deal.  They stop taking landscapes in the middle of the day and at least find shade to shoot portraits to avoid ugly harsh shadows.   Most of their pictures look better than an average person could do, and they are beginning to be known by friends and family as a photographer.

How to spot a stage three photographer…
  • Their best photos are macro shots of flowers.  At some point they need to realize that photos of flowers are EASY.
  • Their photos almost always incorporate good lighting, but they occasionally leave one in there with bad lighting because they really liked the subject, or because they have some sort of “war story” from the shoot that makes them especially fond of the photo.
  • A few of the photos in the portfolio look quite good, but most of them are just “nice.”
  • When the photos are shown to friends or family members, they have said things like, “Wow!  You could sell that!”
  • Stage three photographers are always eyeing the 5D Mark III or D800, and secretly tell themselves that their photos will finally be professional if they just had the right equipment.
  • They have entered the world of Photoshop and post-processing and can do some really neat tricks, but a professional would look at the photos and clearly see the image quality being ruined by untrained hands.  When I look through portfolios, I’m amazed how many pictures are WAY over-sharpened, grainy, or where the colors are all messed up.  This makes it easy to spot a stage three photographer.

Stage Four Photographer
Stage Four Photographers are just on the cusp of consistently producing professional work, but they still have some baby habits deeply ingrained in their heads.  These photographers are known by most of their family and friends as a “really serious photographer” and have at least considered going pro.  They spend a tremendous amount of time or effort working to get their work noticed by others, but have a tough time drawing as many eyeballs to their work as they would like.

How to spot a stage four photographer…

  • Most of their photos look good only because they include some interesting style or technique, rather than being a photo that can stand on its own.   Often this means that 90% of the photos have creatively tilted horizons, over-processed HDR photos (which they always describe as a “really subtle HDR effect”), overly vibrant colors, are taken from extreme angles, or are weirdly wide panoramas.  There is nothing WRONG with these techniques, but it is obvious when a photographer is using them as a crutch, because only a few of the photos in the portfolio can stand on their own without one of these techniques.
  • Every photo in their portfolio is quite good and any amateur photographer would be envious.
  • None of the photos in their portfolio have technical problems.  Everything is sharply focused, properly exposed, and most (but not all) of their poor Photoshop habits have gone by the wayside so their image quality is now quite good.
  • They have been asked by people who are NOT family members, friends, or co-workers to shoot an event for them or to buy their photos.
  • The photographer rarely notices it, but a trained eye sees many distracting elements in the photos that take away from the overall picture.

Stage Five Photographers
While these photographers are not all full-time pros, they are capable of consistently producing truly professional-quality work.  People can’t take their eyes off the photos they see from these photographers, and people often ask if the image was “Photoshopped” because the post-processing adds interest without creating surrealism.  They recognize that gear is fun to talk about and buy, but find themselves scaling back to just the essentials on many of their shoots.

How to spot a stage five photographer…
  • Every shot in the portfolio has perfect image quality (no graininess or wacko effects added in post-processing) and is shot with perfect technical skill.
  • The photographer is capable of shooting any event and returning with very good pictures that have interesting lighting.
  • The compositions of these photographers are mature and make the photo feel put-together and solid without being too extreme.
  • Each element in the frame is carefully placed and no distracting elements have slipped their way into the frame.  Each item in the photo plays a specific role in the overall composition.
  • The photos are not just “correct” or good, or even really good–they are jaw-droppingly good.
  • The photographer’s portraits are not only nice looking, but they actually communicate something about the person being photographed.  They truly “tell a story.”

Stage Six Photographers
These photographers have grown bored of taking “professional quality” pictures.  It is no longer challenging to go somewhere and create work that is impressive to others.  They find their drive to continue learning photography in challenging themselves with specific techniques and styles.

How to spot a stage six photographer…
  • Their work is no longer “random” with one sports picture, then a wildlife shot, then a landscape, etc.  All of the photos in the portfolio go together and you can spot the photographer’s style coming through in the work.
  • The photographers can create art without the crutch of a beautiful subject, even if that is what they choose to take pictures of.
  • They create photography for their enjoyment and the praise of others has at least deadened some.
The Takeaway
I hope that, by posting this, no one feels discouraged in their photography.  Portfolio reviews are not about seeing if you “measure up.”  They are intended to help you along your way in becoming the type of photographer that you want to be.
I hope you take the information from this post–realizing that it is the culmination of reviewing hundreds of portfolios–and decide on at least one thing you can do to become better.
What did you learn from this?  Be honest with yourself and share in the comments below.  I’m anxious to see what struck a chord with you.

Thursday, October 25, 2012

How to Color Calibrate Your Monitor for Photo Editing


Computer monitors do their best to reproduce colors and brightnesses correctly, but each one is slightly different.  In fact, a screen even reproduces photos differently when it starts up compared to the way colors and brightnesses look after the monitor has been running for a while.

This is a serious problem for photographers.  We are careful to set the white balance properly in Photoshop or Lightroom, but what good does it do if your screen is not properly calibrated?  Answer–none!  The same is true for adjusting color saturation, brightness, and just about everything else.
Here's a photo I edited before and after color calibrating. See the difference? Which side do you think is the color calibrated one? If your screen isn't calibrated, it can be hard to tell!

Does everyone need to calibrate their monitor?
Probably not.  If you’re just a hobbyist photographer who is learning the ropes, this probably isn’t the biggest fish you have to fry.  There are many more important things to learn in photography than color calibration; however, if you’re more serious of a photographer and want to know that your photos look their best… then it’s time to calibrate!


I will note, however, that not all photographers agree on screen calibration.  Dustin likes to do the manual calibration,  I prefer to use the screen calibrator.  It gives us something to argue about while we’re barbecuing.

Is monitor calibration only for printing?  Will it mess up my photos on the web?

No way!  The purpose of calibration is to make sure that your eye sees the photo the same way on your screen as others will see it.  For printing, you can be sure that by calibrating your screen your photo will look very close to how it looked on your computer screen.
However, when you edit on a calibrated screen and then post your photo online, it does not mean that everyone else will see the photo properly.  Their screens are most likely uncalibrated, but it is still important to calibrate.  Why?  Because computer monitor manufacturers strive to make their products reproduce colors properly, so by color calibrating, you’ll be at neutral even if some screens are off one way and others are off another way.
There is a caveat, however.  Almost without exception, computer monitors are kept brighter than a calibrated screen.  So if I edit a photo on a calibrated device, it will likely show up a TINY BIT darker on uncalibrated monitors.  Most people find that they like their screens pretty bright.  The way that I avoid this is to simply brighten my photos a TINY bit in Photoshop or Lightroom before posting on the web since I know most people will be viewing the photo on a brighter screen.

What if my monitor can’t adjust enough?

It is possible that your monitor will be off enough and not have the necessary adjustments that it couldn’t be properly calibrated.  However, the way that the color calibration tool that I personally use works, is that it simply saves a new color profile on your machine, so there is no need at all to adjust settings on the screen.  It does everything for you.

What tool do you recommend for color calibration?

No doubt, what you’re looking for is the Spyder 4 Express from DataColor.  Color calibration tools often cost over $1,000, but this little piece of love does the job for around $110.  I personally use the Spyder color calibrator and it works VERY well.  The one I use is the “Elite” not the express, but most people probably can get away just fine with the Express.  I really like the free software that comes with the tool.  It walks you through the process step-by-step and makes it amazingly simple.  You can easily calibrate the screen in just 3 minutes.

Is there a free option for color calibration?


Yep!  Windows 7 comes with a monitor calibration tool built-in.  The trouble with this and many other tools is that it is quite subjective and inaccurate, but it might be a good option for photographers who don’t want to spend a load of money on a color calibration device.  This will at least get you closer.

On Windows 7, go to  Start > Control Panel > Appearance and Personalization > Display > Calibrate Color.  Then open that program which will walk you through how to get a ROUGH approximation of a calibrated screen.


Wednesday, October 24, 2012

How to Become a Photographer

Post-secondary education is not required for portrait photographers. Photojournalists and industrial and scientific photographers often need a bachelor’s degree. Employers usually seek applicants with a “good eye” and creativity, as well as a good technical understanding of photography.
Education : 
Although formal education is not required for most photographers, many take classes or earn a bachelor’s degree in a related field, which can improve their skills and employment prospects.
Many universities, community and junior colleges, vocational–technical institutes, and private trade and technical schools offer classes in photography. Basic courses in photography cover equipment, processes, and techniques. Art schools may offer useful training in photographic design and composition.
Portrait photographers take pictures
    of individuals or groups of people and usually work in their own studios.
Entry-level positions in photojournalism or in industrial or scientific photography generally require a college degree in photography or in a field related to the industry in which the photographer seeks employment. For example, classes in biology, medicine, or chemistry may be useful for scientific photographers.
Business, marketing, and accounting classes can be helpful for self-employed photographers.
Training : 
Photographers often start working as an assistant to a professional photographer. This work provides an opportunity to gain experience, build their portfolio, and gain exposure to prospective clients.
For many artists, including photographers, developing a portfolio—a collection of an artist’s work that demonstrates his or her styles and abilities—is essential. This portfolio is necessary because art directors, clients, and others look at an artist’s portfolio when deciding whether to hire or contract with the photographer.
Important Qualities : 
Artistic ability. Photographers capture their subjects in images, and they must be able to evaluate the artistic quality of a photograph. Photographers need "a good eye"—the ability to use colors, shadows, shades, light, and distance to compose good photographs.
Business skills. Photographers must be able to plan marketing strategies, reach out to prospective clients, and anticipate seasonal employment.
Computer skills. Most photographers do their own postproduction work and must be familiar with photo editing software. They also use computers to keep a digital portfolio and to communicate with clients.
Customer service skills. Photographers must be able to understand the needs of their clients and propose solutions.
Detail-oriented skills. Photographers who do their own postproduction work must be careful not to overlook details and must be thorough when editing photographs. In addition, photographers accumulate many photographs and must maintain them in an orderly fashion.
Interpersonal skills. Photographers often photograph people. They must communicate effectively to achieve a certain composition in a photograph.

Landscape Photography Tips Video: Creative Composition

Watch video here :                    


In this short 5-minute video, Jim Harmer walks through the steps to create a stunning landscape photo.  Follow Jim as he takes a landscape picture on the beach in Naples, Florida and then takes the photo home to post-process the image using Lightroom 3 and Photoshop’s Adobe Camera Raw.

Creative photography tip for landscape photographers. Using a long exposure to show foreground movement in waves will create a sense of depth in your photos. The image is taken and then processed in Lightroom 3.

Photography Tips from this Video:

Photography Tip #1: Consider placing a foreground element very close to the camera.  This will add depth to the photo and draw the viewer into the scene.  Whenever you compose a landscape photo, remember: FOREGROUND, MID-GROUND, BACKGROUND.

Photography Tip #2:  If you’re near water, you can use the waves as a foreground element by using a slow shutter speed and using the motion blur to add interest to the photo.

Photography Tip #3: When the sun is about to rise, or right before the sun sets, there is hidden color in the sky that isn’t yet pronounced.  If you capture these delicately lit scenes in a RAW file, then you can bring out the hidden color in Photoshop’s Adobe Camera Raw, or in Lightroom 3.

Photography Tip #4: Using a tripod for landscape photos will make the fine details in the foreground more clear and sharp.

Photography Tip #5: Don’t get locked into only shooting from eye-level.  GET DOWN LOW to shoot landscapes!

Thursday, October 11, 2012

Tips for Getting Tack-Sharp Photos

The 7 Tips for Getting Tack-Sharp Photos Every Time

Over the last year and a half, hundreds of students have taken my online beginning photography class.  By FAR, the most common problem that Dustin and I have seen as we review photos from our students is poor sharpness.
Sometimes, the photos are clearly blurry to the point that anyone would notice the problem.  But most of the time, the photos have fair sharpness, but they just aren’t quite as crisp and clear as they could be.
It can be difficult for photographers to learn how to take tack sharp pictures because there is no silver bullet.  The truth is that there are at least 7 mistakes that can lead to photos that aren’t sharp.  In today’s lesson, we want to provide the ultimate resource for learning to take sharp photos.
With no further adieu, the 7 deadly sins of sharpness…

1. Improper Focus
After looking at many many photos from beginning photographers and analyzing each one to determine what problem caused the photo to come out soft, we have determined that improper focusing technique is the number one culprit.
Usually, the problem is that photographers are not as exact in their focusing as they should be.  We often find that the photographer did not put the focus point on the subject’s eye, and instead had the camera focus on the subject’s shoulder, nose, forehead, etc.  This is especially common with photographer who have not yet learned how to manually move the focus point that the camera is using.  Check out this post if you need help with this.
Another common problem stems from the use of the focus and recompose method of shooting.  This method is used when the photographer wants to focus the camera on a spot where there is no focus point, and is especially common on entry-level DSLR cameras which only have 9 or 13 autofocus points.  So the photographer uses the middle focus point and aims it at the subject’s eye.  Then the photographer holds down the shutter button half-way as she recomposes the photo to the proper framing for the picture, and then presses the rest of the way down.  While this is the only practical way to focus on cameras that don’t have enough focus points, it can lead to problems when shooting with shallow depth-of-field if the photographer shifts the angle of the camera while recomposing, or if her finger slips on the shutter button.
For more advanced photographers, you might also like to learn how to do back button focus.
How to fix it: If you need to use the focus and recompose method because your camera doesn’t have a focus point for where you want to focus, use great care not to move the camera around too much which may alter the plane of focus.  If you have enough autofocus points in your camera, moving the focus point around to match your composition is the preferred method.


2. Failing to sharpen the image
No photo is as sharp as it should be when it comes off the imaging sensor in your camera.  To compensate for this, you’ll need to apply some sharpening on the computer if you shoot in RAW.  If you shoot in JPEG, then make sure the picture control/picture style set in your camera is applying some capture sharpening for you.
There are many two main types of sharpening: capture and output.  Both are necessary to produce crystal clear photos.  Capture sharpening is used to compensate for inherent optical issues in all lenses and cameras.  Capture sharpening is generally applied to a RAW photo as it is brought into Lightroom or Photoshop, and you may find that these programs are applying capture sharpening behind the scenes.
Aside from sharpening the captured image, tack sharp photos also need to be sharpened at output.  In general, the larger your final photo will be, the more sharpening you need to apply.  For example, if I’m outputting a file for a 20″x30″ print (50×76 centimeters), then I would want to apply a lot of sharpness to the photo in Photoshop.  For example, I might use these settings in Filter>Unsharp Mask: Amount 100, radius 2.3.  At the same time, if I were printing a small photo, or using a smaller photo on the web, I would use much less sharpening: Amount 50, radius 1.7.  While you want to be careful not to apply too much sharpening, a little bit of it goes a long way.

3. Camera Blur
Camera blur simply means that the camera moved while the image was being taken, resulting in a blurry photo.  The most common cause of this is when a photographer mashes down the shutter button because they are excited.  Pushing the shutter button too forcefully moves the camera and will always reduce the sharpness of the photo.
Another common cause of camera blur is when the photographer uses too low of a shutter speed, so that the natural shaking of one’s hands causes blur in the photo.  No one, not even brain surgeons, can hold their hands perfectly steady.  We all shake just slightly, and that can often be enough to cause a blurry photo if the photographer’s shutter speed is too low.
How to fix it: To fix camera blur, try to keep your shutter speed at 1/the focal length of the lens.  So if you’re using a 100mm lens, then your shutter speed should be 1/100.  This is a general rule, and obviously only works when the subject that you’re shooting is still.
Also, using lenses with image stabilization (Canon) or Vibration Reduction (Nikon) will help reduce camera blur.  This technology compensates for camera shake by moving the lens around to steady the shot.

4. Motion Blur
Motion blur is simple.  It means that the photographer used too slow of a shutter speed for the movement in a scene.  If you’re shooting a sports game, you would almost always want a shutter speed around 1/1000 of a second in order to freeze the motion in the scene.  For more on this, check out this article on shutter speed.
How to fix it: Use a fast enough shutter speed to match your situation.  For general portraits, you’ll want a shutter speed of at least 1/100.  For slight movement (a walking model, for example), a shutter speed of 1/320 will often be sufficient.  For fast motion like sports, 1/1000 is generally enough to freeze the motion.

5.  Poor Lens Design

The fact is that most photographers start out learning photography on inexpensive lenses.  Obviously, it would be nice if all photographers could use expensive pro lenses that capture crystal clear images… the fact of the matter is that most photographers can’t afford the pro lenses.  That’s okay!  You can still capture tack sharp photos if you learn to take advantage of the lenses you already own.
How to fix it: Two quick tips for achieving sharp images from inexpensive lenses are (1) do not use the lens at either extreme of the aperture range.  So if your lens goes down to f/5.6, then consider shooting at f/7.1 when possible.  This will generally be a sharper aperture on that lens.  (2) Try not to shoot the lens at either extreme of the focal range.  So if you have a lens that goes from 18mm to 55mm, consider shooting at the middle of the focal range for better results.  Each lens is different in this way and has different sweet spots, but these general rules will often produce sharper images.

6. Too Shallow Depth-of-Field
Portrait photographers are often taught to use shallow depth-of-field to achieve a creamy blur in the background of the image.  While this is a great technique, I often find that photographers go too far.
If you use a very low aperture such as f/2.8, and you use a long lens and stand close to the subject, then your depth-of-field will be razor thin.  Often, this means that the photo will show the subject’s eyes in focus, but her nose or the back of her head will be out of the plane of focus.  In general, it is advisable to increase your depth-of-field just slightly in these situations so that the entire head or body of the subject is in focus.
This is especially true when shooting engagement, wedding, or family photography.  We often find that photographers who shoot couples or groups use too shallow a depth-of-field and this results in only some of the people in the photo being in focus.
How to fix it: Always focus on the front person in the group, or for couples, focus on the closes person to the camera, and increase your aperture just slightly to give more depth of field.

7. Diopter Not Properly Adjusted
The diopter is a (very) small wheel next to the viewfinder on almost all DSLRs that allows the photographer to make minor adjustments to the focus of view that the viewfinder shows looking through the lens.  Adjusting the diopter does NOT affect the image recorded by the imaging sensor, but only the view you see when looking through the viewfinder.
The reason that adjusting the diopter is important, is that having it set properly will allow the photographer to see in the viewfinder exactly how well focused the image is.  This can go a long way in spotting problems such as improper focus while taking the photo.How to fix it: Next time you grab your camera, look closely for a tiny wheel to the right of your viewfinder.  You may not have noticed it before,  Look through the viewfinder at something about 30 feet (9 meters) away with a long lens on.  Carefully scroll the diopter until the view through the viewfinder looks perfectly sharp for you.  This will depend on your vision and will not be the same for everyone